

Managing Table Layouts and Assignments
The Floor/Room Plan module allows restaurant managers and staff to visually organise and manage table arrangements within different dining areas. This feature is available only for the admin accounts as it helps streamline seating arrangements, improve customer service, and maximise table occupancy.
Accessing the Floor/Room Plan
- Navigate to Bookings → Room Plan from the left-side menu.
- Select the desired dining area (e.g., Restaurant, Terrasse, Grill, Private Room) from the tabs at the top.
- View, modify, or add tables using the interactive layout, as per instructions below.
Adding or Modifying Tables
- Click “Add a Table” on the left panel.
- Move tables within the layout by clicking and dragging them to new positions.
- Rotate tables by selecting them and using the rotation handle.
- Use the vertical layout toggle for different views.
- Enter the Table Name (choose it from the list).
- Select the table shape (Square, Round, Rectangular).
- Define Minimum and Maximum Seats for the table.
- Set priority sorting to determine table arrangements (which one will be booked before others.
- Toggle Multiple Bookings, Disabled, or Disabled Online as needed.
- Click Confirm to save changes.
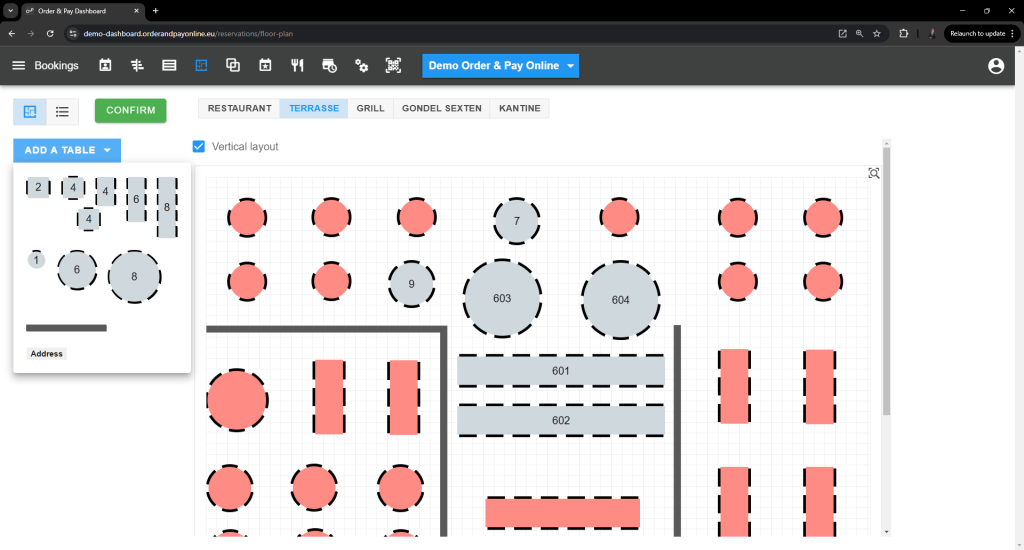
Table Status & Availability
Tables can have different status colours:
- Grey – Available for new bookings.
- Red – Not available for online booking.
Each table can also be configured for:
- Multiple Bookings (Allow multiple reservations per table at same time).
- Disabled Tables (Prevent booking completely).
- Disabled Online (Make the table available offline reservation in for walk-ins but not online bookings).
Sorting and Organising Tables
- Tables can be sorted manually based on their importance or layout using the Sort Priority field.
- If the tables are not sorted the booking will be done authomatically using the AI algorithms.
List view (alternative)
On the othe hand the tables can be also viewed in the list view. This is a list by:
- Table Name – Identifies each table.
- Table Shape – Defines whether the table is Round, Square, or Rectangular.
- Sort Priority – Sets the ordering of tables within the system.
- Minimum & Maximum Seats – Defines seating capacity for each table.
- Multiple Bookings – Allows automatic table combining.
- Disabled – Marks the table as unavailable for all bookings.
- Disabled Online – Prevents the table from being booked through the online system (available for walk-ins only).
Best Practices
Regularly update the table layout to reflect any physical changes in the restaurant.
- Use Table Combinations to join multiple tables for large parties, learn more here.
- Assign tables in advance to optimise seating arrangements and avoid last-minute adjustments.
- Monitor table availability to reduce waiting times and improve service efficiency.
FAQ
Q: Can I create multiple floor plans for different parts of the restaurant?
A: Yes, different layouts can be edited and saved for different parts, such as terrase, grill,…
Q: How do I sort tables if I want the restaurant to fill from the left end to the right?
A: To sort tables so the restaurant fills from the left end to the right, go to Floor plan → Table priority sorting and adjust the sort priority. Assign lower numbers to tables on the left and higher numbers to those on the right. This way, the system will prioritise seating guests from left to right as bookings come in.
Q: Can I prevent certain tables from being booked online?
A: Yes, you can mark a table as Disabled Online, which makes it available for walk-ins only.